Peterfei

上主是我的牧者,我实在一无所缺


  • 首页

  • 归档

  • 标签

Helm 创建高可用mysql集群

发表于 2023-05-13   |  

helm 安装 MySQL 1主2从#

1. 添加 bitnami 的仓库#

1
Copy$ helm repo add kubegemsapp https://charts.kubegems.io/kubegemsapp

2. 查询 MySQL 资源#

1
2
3
4
5
6
7
8
$ helm repo update
$ helm search repo mysql
NAME CHART VERSION APP VERSION DESCRIPTION
bitnami/mysql 8.9.6 8.0.29 MySQL is a fast, reliable, scalable, and easy t...
bitnami/phpmyadmin 10.0.1 5.1.3 phpMyAdmin is a free software tool written in P...
bitnami/mariadb 11.0.2 10.6.7 MariaDB is an open source, community-developed ...
bitnami/mariadb-cluster 1.0.2 10.2.14 DEPRECATED Chart to create a Highly available M...
bitnami/mariadb-galera 7.1.8 10.6.7 MariaDB Galera is a multi-primary database clus...

3. 拉取 MySQL chart 到本地#

1
2
3
4
5
6
7
8
9
10
11
12
13
14
15
16
17
18
19
20
21
$ mkdir /root/mysql && cd /root/mysql
# 拉取 chart 到本地 /root/mysql 目录
$ helm pull kubegemsapp/mysql --version 4.5.2
$ tar -xvf mysql-4.5.2.tgz
$ cp mysql/values.yaml ./values.yaml
# 查看当前目录层级
$ tree -L 2
.
├── mysql
│ ├── Chart.yaml
│ ├── files
│ ├── README.md
│ ├── templates
│ ├── values-production.yaml
│ └── values.yaml
├── mysql-4.5.2.tgz
└── values.yaml

4. 对本地 values-test.yaml 修改#

  • 查看集群 storageclasses
1
2
3
4
5
$ kubectl get storageclasses.storage.k8s.io
NAME PROVISIONER RECLAIMPOLICY VOLUMEBINDINGMODE ALLOWVOLUMEEXPANSION AGE
openebs-device openebs.io/local Delete WaitForFirstConsumer false 34d
openebs-hostpath openebs.io/local Delete WaitForFirstConsumer false 34d
openebs-jiva-default jiva.csi.openebs.io Delete Immediate true 33d
  • 修改配置
1
2
3
4
5
6
7
8
9
10
11
12
13
14
15
16
17
18
19
20
21
22
23
24
25
26
27
28
29
30
31
32
33
34
35
36
37
38
39
40
41
42
43
44
45
46
47
48
49
50
51
52
53
54
55
56
57
58
59
60
61
62
63
64
65
66
67
68
69
70
71
72
73
74
75
76
77
78
79
80
81
82
83
84
85
86
87
88
89
90
91
92
93
94
95
96
97
98
99
100
101
102
103
104
105
106
107
108
109
110
111
112
113
114
115
116
117
118
119
120
121
122
123
124
125
126
127
128
129
130
131
132
133
134
135
136
137
138
139
140
141
142
143
144
145
146
147
148
149
150
151
152
153
154
155
156
157
158
159
160
$ cat values.yaml
nameOverride: mysql
fullnameOverride: mysql
image:
registry: registry.cn-beijing.aliyuncs.com
repository: kubegemsapp/mysql
tag: 5.7.26
pullPolicy: IfNotPresent
service:
type: ClusterIP
port: 3306
securityContext:
enabled: true
fsGroup: 1001
runAsUser: 1001
root:
password: Huazhu@2021
forcePassword: true
db:
user: huazhu
password: Huazhu@2021
name: my_database
forcePassword: true
replication:
enabled: true
#user: huazhu_replicator
user: root
password: Huazhu@2021
forcePassword: true
master:
antiAffinity: soft
updateStrategy:
type: RollingUpdate
persistence:
enabled: true
storageClass: "managed-nfs-storage"
mountPath: /bitnami/mysql
annotations:
accessModes:
- ReadWriteOnce
size: 5Gi
config: |-
[mysqld]
default_authentication_plugin=mysql_native_password
skip-name-resolve
explicit_defaults_for_timestamp
basedir=/opt/bitnami/mysql
port=3306
socket=/opt/bitnami/mysql/tmp/mysql.sock
tmpdir=/opt/bitnami/mysql/tmp
max_allowed_packet=16M
bind-address=0.0.0.0
pid-file=/opt/bitnami/mysql/tmp/mysqld.pid
log-error=/opt/bitnami/mysql/logs/mysqld.log
character-set-server=UTF8
collation-server=utf8_general_ci
[client]
port=3306
socket=/opt/bitnami/mysql/tmp/mysql.sock
default-character-set=UTF8
[manager]
port=3306
socket=/opt/bitnami/mysql/tmp/mysql.sock
pid-file=/opt/bitnami/mysql/tmp/mysqld.pid
resources: {}
livenessProbe:
enabled: true
initialDelaySeconds: 120
periodSeconds: 10
timeoutSeconds: 1
successThreshold: 1
failureThreshold: 3
readinessProbe:
enabled: true
initialDelaySeconds: 15
periodSeconds: 10
timeoutSeconds: 1
successThreshold: 1
failureThreshold: 3
slave:
replicas: 1
antiAffinity: soft
updateStrategy:
type: RollingUpdate
persistence:
enabled: true
storageClass: "managed-nfs-storage"
mountPath: /bitnami/mysql
annotations:
accessModes:
- ReadWriteOnce
size: 5Gi
config: |-
[mysqld]
default_authentication_plugin=mysql_native_password
skip-name-resolve
explicit_defaults_for_timestamp
basedir=/opt/bitnami/mysql
port=3306
socket=/opt/bitnami/mysql/tmp/mysql.sock
tmpdir=/opt/bitnami/mysql/tmp
max_allowed_packet=16M
bind-address=0.0.0.0
pid-file=/opt/bitnami/mysql/tmp/mysqld.pid
log-error=/opt/bitnami/mysql/logs/mysqld.log
character-set-server=UTF8
collation-server=utf8_general_ci
[client]
port=3306
socket=/opt/bitnami/mysql/tmp/mysql.sock
default-character-set=UTF8
[manager]
port=3306
socket=/opt/bitnami/mysql/tmp/mysql.sock
pid-file=/opt/bitnami/mysql/tmp/mysqld.pid
resources: {}
livenessProbe:
enabled: true
initialDelaySeconds: 120
periodSeconds: 30
timeoutSeconds: 1
successThreshold: 1
failureThreshold: 3
readinessProbe:
enabled: true
initialDelaySeconds: 15
periodSeconds: 30
timeoutSeconds: 1
successThreshold: 1
failureThreshold: 3
metrics:
enabled: false
image:
registry: registry.cn-beijing.aliyuncs.com
repository: kubegemsapp/mysqld-exporter
tag: v0.10.0
pullPolicy: IfNotPresent
resources: {}
annotations:
prometheus.io/scrape: "true"
prometheus.io/port: "9104"

6. 安装 MySQL 集群

1
2
3
4
5
6
7
8
9
10
11
12
13
14
15
16
17
18
19
20
21
22
23
24
25
26
27
28
29
30
31
32
33
34
35
36
37
38
39
40
41
42
43
44
45
helm install --namespace mysql mysql-ha -f ./values.yaml ./mysql --set auth.rootPassword=Huazhu@2021
NAME: mysql-cluster
LAST DEPLOYED: Mon May 9 01:54:38 2022
NAMESPACE: test-middleware
STATUS: deployed
REVISION: 1
TEST SUITE: None
NOTES:
Please be patient while the chart is being deployed
Tip:
Watch the deployment status using the command: kubectl get pods -w --namespace test-middleware
Services:
echo Master: mysql-cluster-mysql.test-middleware.svc.cluster.local:3306
echo Slave: mysql-cluster-mysql-slave.test-middleware.svc.cluster.local:3306
Administrator credentials:
echo Username: root
echo Password : $(kubectl get secret --namespace test-middleware mysql-cluster-mysql -o jsonpath="{.data.mysql-root-password}" | base64 --decode)
To connect to your database:
1. Run a pod that you can use as a client:
kubectl run mysql-cluster-mysql-client --rm --tty -i --restart='Never' --image docker.io/bitnami/mysql:5.7.26 --namespace test-middleware --command -- bash
2. To connect to master service (read/write):
mysql -h mysql-cluster-mysql.test-middleware.svc.cluster.local -uroot -p my_database
3. To connect to slave service (read-only):
mysql -h mysql-cluster-mysql-slave.test-middleware.svc.cluster.local -uroot -p my_database
To upgrade this helm chart:
1. Obtain the password as described on the 'Administrator credentials' section and set the 'root.password' parameter as shown below:
ROOT_PASSWORD=$(kubectl get secret --namespace test-middleware mysql-cluster-mysql -o jsonpath="{.data.mysql-root-password}" | base64 --decode)
helm upgrade mysql-cluster bitnami/mysql --set root.password=$ROOT_PASSWORD

7. 查看部署的 MySQL 集群#

1
2
3
4
5
6
7
8
9
10
11
12
13
14
15
16
17
18
$ helm -n mysql list
NAME NAMESPACE REVISION UPDATED STATUS CHART APP VERSION
mysql-cluster test-middleware 1 2022-05-09 01:54:38.848559008 -0400 EDT deployed mysql-4.5.2 5.7.26
$ kubectl -n mysql get pods -l app=mysql
NAME READY STATUS RESTARTS AGE
mysql-cluster-mysql-master-0 1/1 Running 0 16m
mysql-cluster-mysql-slave-0 1/1 Running 0 16m
mysql-cluster-mysql-slave-1 1/1 Running 0 14m
> mysql-cluster-mysql-master-0 为主,mysql-cluster-mysql-slave-0 和 mysql-cluster-mysql-slave-1 为从
> default名称空间如何访问此 MySQL 集群
> MySQL主节点:mysql-cluster-mysql.test-middleware
> MySQL从节点0:mysql-cluster-mysql-slave-0.mysql-cluster-mysql-slave.test-middleware
> MySQL从节点1:mysql-cluster-mysql-slave-1.mysql-cluster-mysql-slave.test-middleware
  • 查看服务使用的 storageclass
1
2
3
4
5
6
7
8
9
10
11
12
13
Copy# 查看 pvc
$ kubectl -n test-middleware get pvc
NAME STATUS VOLUME CAPACITY ACCESS MODES STORAGECLASS AGE
data-mysql-cluster-mysql-master-0 Bound pvc-b9a1d1ca-44d3-4292-af45-e6f3b3063395 8Gi RWO openebs-jiva-default 31m
data-mysql-cluster-mysql-slave-0 Bound pvc-0d234b12-26eb-4e07-9dc0-ef9f0230e9fa 8Gi RWO openebs-jiva-default 31m
data-mysql-cluster-mysql-slave-1 Bound pvc-16531f4b-41ac-4a04-9d90-04b92aab7b49 8Gi RWO openebs-jiva-default 29m
# 查看 pv
$ kubectl get pv
NAME CAPACITY ACCESS MODES RECLAIM POLICY STATUS CLAIM STORAGECLASS REASON AGE
pvc-b9a1d1ca-44d3-4292-af45-e6f3b3063395 8Gi RWO Delete Bound test-middleware/data-mysql-cluster-mysql-master-0 openebs-jiva-default 33m
pvc-0d234b12-26eb-4e07-9dc0-ef9f0230e9fa 8Gi RWO Delete Bound test-middleware/data-mysql-cluster-mysql-slave-0 openebs-jiva-default 33m
pvc-16531f4b-41ac-4a04-9d90-04b92aab7b49 8Gi RWO Delete Bound test-middleware/data-mysql-cluster-mysql-slave-1 openebs-jiva-default 31m

8. 连接 MySQL 集群 验证服务#

1
2
3
4
5
6
7
8
9
10
11
12
13
14
15
16
17
18
19
20
21
22
23
24
25
26
27
28
29
30
31
32
33
34
35
36
37
38
39
40
41
42
43
44
45
46
47
48
49
50
51
52
53
54
55
56
57
58
59
60
61
62
63
64
65
66
67
68
69
70
71
72
73
74
75
76
77
78
79
80
81
82
83
84
85
86
87
88
89
90
91
92
93
94
95
96
97
98
99
100
101
102
103
104
105
Copy# 获取 MySQL 集群的密码
$ kubectl get secret --namespace mysql mysql -o jsonpath="{.data.mysql-root-password}" | base64 --decode
Huazhu@2021
# 启动一个临时容器
$ kubectl run mysql-cluster-mysql-client --rm --tty -i --restart='Never' --image docker.io/bitnami/mysql:5.7.26 --namespace mysql --command -- bash
## 登陆 MySQL Master节点
$ mysql -h mysql.mysql -uroot -p
Enter password: # Huazhu@2021
mysql> show databases;
+--------------------+
| Database |
+--------------------+
| information_schema |
| my_database |
| mysql |
| performance_schema |
| sys |
+--------------------+
5 rows in set (0.00 sec)
# 查看主从状态
# 查看File和Position的值,在从库配置中会显示。
> show master status\G;
*************************** 1. row ***************************
File: mysql-bin.000002
Position: 154
Binlog_Do_DB:
Binlog_Ignore_DB:
Executed_Gtid_Set:
1 row in set (0.00 sec)
ERROR:
No query specified
## 登陆从库,查看主从同步状态
$ mysql -h mysql-mysql-slave.mysql -uroot -p
Enter password: # root123
mysql> show slave status\G;
*************************** 1. row ***************************
Slave_IO_State: Waiting for master to send event
Master_Host: mysql-cluster-mysql
Master_User: replicator
Master_Port: 3306
Connect_Retry: 10
Master_Log_File: mysql-bin.000002 # File: mysql-bin.000002
Read_Master_Log_Pos: 154 # Position: 154
Relay_Log_File: mysql-relay-bin.000004
Relay_Log_Pos: 367
Relay_Master_Log_File: mysql-bin.000002
Slave_IO_Running: Yes
Slave_SQL_Running: Yes
Replicate_Do_DB:
Replicate_Ignore_DB:
Replicate_Do_Table:
Replicate_Ignore_Table:
Replicate_Wild_Do_Table:
Replicate_Wild_Ignore_Table:
Last_Errno: 0
Last_Error:
Skip_Counter: 0
Exec_Master_Log_Pos: 154
Relay_Log_Space: 2236
Until_Condition: None
Until_Log_File:
Until_Log_Pos: 0
Master_SSL_Allowed: No
Master_SSL_CA_File:
Master_SSL_CA_Path:
Master_SSL_Cert:
Master_SSL_Cipher:
Master_SSL_Key:
Seconds_Behind_Master: 0
Master_SSL_Verify_Server_Cert: No
Last_IO_Errno: 0
Last_IO_Error:
Last_SQL_Errno: 0
Last_SQL_Error:
Replicate_Ignore_Server_Ids:
Master_Server_Id: 641
Master_UUID: aa7a516b-cf5c-11ec-b974-a2ee403fe88f
Master_Info_File: mysql.slave_master_info
SQL_Delay: 0
SQL_Remaining_Delay: NULL
Slave_SQL_Running_State: Slave has read all relay log; waiting for more updates
Master_Retry_Count: 86400
Master_Bind:
Last_IO_Error_Timestamp:
Last_SQL_Error_Timestamp:
Master_SSL_Crl:
Master_SSL_Crlpath:
Retrieved_Gtid_Set:
Executed_Gtid_Set:
Auto_Position: 0
Replicate_Rewrite_DB:
Channel_Name:
Master_TLS_Version:
1 row in set (0.00 sec)
ERROR:
No query specified

Helm 创建高可用redis集群

发表于 2023-05-11   |  

数据 在多个Redis节点之间自动分片

sentinel特点:

1
2
3
4
5
它的主要功能有以下几点
不时地监控redis是否按照预期良好地运行;
如果发现某个redis节点运行出现状况,能够通知另外一个进程(例如它的客户端);
能够进行自动切换。当一个master节点不可用时,能够选举出master的多个slave(如果有超过一个slave的话)中的一个来作为新的master,其它的slave节点会将它所追随的master的地址改为被提升为master的slave的新地址。

sentinel配置文件详解

参考:https://segmentfault.com/a/1190000002680804

主节点down了,从节点选举机制如下:

  https://blog.csdn.net/tr1912/article/details/81265007

安装redis集群

我们首先添加一下helm库,并且搜索到redis

1
2
3
4
5
6
7
8
$ helm repo add bitnami https://charts.bitnami.com/bitnami
$ helm search repo redis
NAME CHART VERSION APP VERSION DESCRIPTION
bitnami/redis 14.6.6 6.2.4 Open source, advanced key-value store. It is of...
bitnami/redis-cluster 6.2.3 6.2.4 Open source, advanced key-value store. It is of...
stable/prometheus-redis-exporter 3.5.0 1.3.4 Prometheus exporter for Redis metrics
stable/redis 10.5.7 5.0.7 DEPRECATED Open source, advanced key-value stor...
stable/redis-ha 4.4.6 5.0.6 DEPRECATED - Highly available Kubernetes implem...
1
2
3
4
helm search repo redis
helm pull stable/redis-ha
tar zxvf redis-ha-*.tgz
cp redis-ha/values.yaml .

cat value.yaml

1
2
3
4
5
6
7
8
9
10
11
12
13
14
15
16
17
18
19
20
21
22
23
24
25
26
27
28
29
30
31
32
33
34
35
36
37
38
39
40
41
42
43
44
45
46
47
48
49
50
51
52
53
54
55
56
57
58
59
60
61
62
63
64
65
66
67
68
69
70
71
72
73
74
75
76
77
78
79
80
81
82
83
84
85
86
87
88
89
90
91
92
93
94
95
96
97
98
99
100
101
102
103
104
105
106
107
108
109
110
111
112
113
114
115
116
117
118
119
120
121
122
123
124
125
126
127
128
129
130
131
132
133
134
135
136
137
138
139
140
141
142
143
144
145
146
147
148
149
150
151
152
153
154
155
156
157
158
159
160
161
162
163
164
165
166
167
168
169
170
171
172
173
174
175
176
177
178
179
180
181
182
183
184
185
186
187
188
189
190
191
192
193
194
195
196
197
198
199
200
201
202
203
204
205
206
207
208
209
210
211
212
213
214
215
216
217
218
219
220
221
222
223
224
225
226
227
228
229
230
231
232
233
234
235
236
237
238
239
240
241
242
243
244
245
246
247
248
249
250
251
252
253
254
255
256
257
258
259
260
261
262
263
264
265
266
267
268
269
270
271
272
273
274
275
276
277
278
279
280
281
282
283
284
285
286
287
288
289
290
291
292
293
294
295
296
297
298
299
300
301
302
303
304
305
306
307
308
309
310
311
312
313
314
315
316
317
318
319
320
321
322
323
324
325
326
327
328
329
330
331
332
333
334
335
336
337
338
339
340
341
342
343
344
345
346
347
348
349
350
351
352
353
354
355
356
357
358
359
360
361
362
## Configure resource requests and limits
## ref: http://kubernetes.io/docs/user-guide/compute-resources/
##
image:
repository: redis
tag: 5.0.6-alpine
pullPolicy: IfNotPresent
## Reference to one or more secrets to be used when pulling images
## ref: https://kubernetes.io/docs/tasks/configure-pod-container/pull-image-private-registry/
## This imagePullSecrets is only for redis images
##
imagePullSecrets: []
# - name: "image-pull-secret"
## replicas number for each component
replicas: 3
## Kubernetes priorityClass name for the redis-ha-server pod
# priorityClassName: ""
## Custom labels for the redis pod
labels: {}
## Pods Service Account
## ref: https://kubernetes.io/docs/tasks/configure-pod-container/configure-service-account/
serviceAccount:
## Specifies whether a ServiceAccount should be created
##
create: true
## The name of the ServiceAccount to use.
## If not set and create is true, a name is generated using the redis-ha.fullname template
# name:
## Enables a HA Proxy for better LoadBalancing / Sentinel Master support. Automatically proxies to Redis master.
## Recommend for externally exposed Redis clusters.
## ref: https://cbonte.github.io/haproxy-dconv/1.9/intro.html
haproxy:
enabled: false
# Enable if you want a dedicated port in haproxy for redis-slaves
readOnly:
enabled: false
port: 6380
replicas: 3
image:
repository: haproxy
tag: 2.0.4
pullPolicy: IfNotPresent
## Reference to one or more secrets to be used when pulling images
## ref: https://kubernetes.io/docs/tasks/configure-pod-container/pull-image-private-registry/
##
imagePullSecrets: []
# - name: "image-pull-secret"
annotations: {}
resources: {}
emptyDir: {}
## Enable sticky sessions to Redis nodes via HAProxy
## Very useful for long-living connections as in case of Sentry for example
stickyBalancing: false
## Kubernetes priorityClass name for the haproxy pod
# priorityClassName: ""
## Service type for HAProxy
##
service:
type: ClusterIP
loadBalancerIP:
annotations: {}
serviceAccount:
create: true
## Official HAProxy embedded prometheus metrics settings.
## Ref: https://github.com/haproxy/haproxy/tree/master/contrib/prometheus-exporter
##
metrics:
enabled: false
# prometheus port & scrape path
port: 9101
portName: exporter-port
scrapePath: /metrics
serviceMonitor:
# When set true then use a ServiceMonitor to configure scraping
enabled: false
# Set the namespace the ServiceMonitor should be deployed
# namespace: monitoring
# Set how frequently Prometheus should scrape
# interval: 30s
# Set path to redis-exporter telemtery-path
# telemetryPath: /metrics
# Set labels for the ServiceMonitor, use this to define your scrape label for Prometheus Operator
# labels: {}
# Set timeout for scrape
# timeout: 10s
init:
resources: {}
timeout:
connect: 4s
server: 30s
client: 30s
check: 2s
securityContext:
runAsUser: 1000
fsGroup: 1000
runAsNonRoot: true
## Whether the haproxy pods should be forced to run on separate nodes.
hardAntiAffinity: true
## Additional affinities to add to the haproxy pods.
additionalAffinities: {}
## Override all other affinity settings for the haproxy pods with a string.
affinity: |
## Custom config-haproxy.cfg files used to override default settings. If this file is
## specified then the config-haproxy.cfg above will be ignored.
# customConfig: |-
# Define configuration here
## Place any additional configuration section to add to the default config-haproxy.cfg
# extraConfig: |-
# Define configuration here
## Role Based Access
## Ref: https://kubernetes.io/docs/admin/authorization/rbac/
##
rbac:
create: true
sysctlImage:
enabled: false
command: []
registry: docker.io
repository: busybox
tag: 1.31.1
pullPolicy: Always
mountHostSys: false
resources: {}
## Use an alternate scheduler, e.g. "stork".
## ref: https://kubernetes.io/docs/tasks/administer-cluster/configure-multiple-schedulers/
##
# schedulerName:
## Redis specific configuration options
redis:
port: 6379
masterGroupName: "mymaster" # must match ^[\\w-\\.]+$) and can be templated
config:
## Additional redis conf options can be added below
## For all available options see http://download.redis.io/redis-stable/redis.conf
min-replicas-to-write: 1
min-replicas-max-lag: 5 # Value in seconds
maxmemory: "0" # Max memory to use for each redis instance. Default is unlimited.
maxmemory-policy: "volatile-lru" # Max memory policy to use for each redis instance. Default is volatile-lru.
# Determines if scheduled RDB backups are created. Default is false.
# Please note that local (on-disk) RDBs will still be created when re-syncing with a new slave. The only way to prevent this is to enable diskless replication.
save: "900 1"
# When enabled, directly sends the RDB over the wire to slaves, without using the disk as intermediate storage. Default is false.
repl-diskless-sync: "yes"
rdbcompression: "yes"
rdbchecksum: "yes"
## Custom redis.conf files used to override default settings. If this file is
## specified then the redis.config above will be ignored.
# customConfig: |-
# Define configuration here
resources: {}
# requests:
# memory: 200Mi
# cpu: 100m
# limits:
# memory: 700Mi
## Sentinel specific configuration options
sentinel:
port: 26379
quorum: 2
config:
## Additional sentinel conf options can be added below. Only options that
## are expressed in the format simialar to 'sentinel xxx mymaster xxx' will
## be properly templated expect maxclients option.
## For available options see http://download.redis.io/redis-stable/sentinel.conf
down-after-milliseconds: 10000
## Failover timeout value in milliseconds
failover-timeout: 180000
parallel-syncs: 5
maxclients: 10000
## Custom sentinel.conf files used to override default settings. If this file is
## specified then the sentinel.config above will be ignored.
# customConfig: |-
# Define configuration here
resources: {}
# requests:
# memory: 200Mi
# cpu: 100m
# limits:
# memory: 200Mi
securityContext:
runAsUser: 1000
fsGroup: 1000
runAsNonRoot: true
## Node labels, affinity, and tolerations for pod assignment
## ref: https://kubernetes.io/docs/concepts/configuration/assign-pod-node/#nodeselector
## ref: https://kubernetes.io/docs/concepts/configuration/assign-pod-node/#taints-and-tolerations-beta-feature
## ref: https://kubernetes.io/docs/concepts/configuration/assign-pod-node/#affinity-and-anti-affinity
nodeSelector: {}
## Whether the Redis server pods should be forced to run on separate nodes.
## This is accomplished by setting their AntiAffinity with requiredDuringSchedulingIgnoredDuringExecution as opposed to preferred.
## Ref: https://kubernetes.io/docs/concepts/configuration/assign-pod-node/#inter-pod-affinity-and-anti-affinity-beta-feature
##
hardAntiAffinity: true
## Additional affinities to add to the Redis server pods.
##
## Example:
## nodeAffinity:
## preferredDuringSchedulingIgnoredDuringExecution:
## - weight: 50
## preference:
## matchExpressions:
## - key: spot
## operator: NotIn
## values:
## - "true"
##
## Ref: https://kubernetes.io/docs/concepts/configuration/assign-pod-node/#affinity-and-anti-affinity
##
additionalAffinities: {}
## Override all other affinity settings for the Redis server pods with a string.
##
## Example:
## affinity: |
## podAntiAffinity:
## requiredDuringSchedulingIgnoredDuringExecution:
## - labelSelector:
## matchLabels:
## app: {{ template "redis-ha.name" . }}
## release: {{ .Release.Name }}
## topologyKey: kubernetes.io/hostname
## preferredDuringSchedulingIgnoredDuringExecution:
## - weight: 100
## podAffinityTerm:
## labelSelector:
## matchLabels:
## app: {{ template "redis-ha.name" . }}
## release: {{ .Release.Name }}
## topologyKey: failure-domain.beta.kubernetes.io/zone
##
affinity: |
# Prometheus exporter specific configuration options
exporter:
enabled: false
image: oliver006/redis_exporter
tag: v1.3.2
pullPolicy: IfNotPresent
# prometheus port & scrape path
port: 9121
scrapePath: /metrics
# cpu/memory resource limits/requests
resources: {}
# Additional args for redis exporter
extraArgs: {}
# Used to mount a LUA-Script via config map and use it for metrics-collection
# script: |
# -- Example script copied from: https://github.com/oliver006/redis_exporter/blob/master/contrib/sample_collect_script.lua
# -- Example collect script for -script option
# -- This returns a Lua table with alternating keys and values.
# -- Both keys and values must be strings, similar to a HGETALL result.
# -- More info about Redis Lua scripting: https://redis.io/commands/eval
#
# local result = {}
#
# -- Add all keys and values from some hash in db 5
# redis.call("SELECT", 5)
# local r = redis.call("HGETALL", "some-hash-with-stats")
# if r ~= nil then
# for _,v in ipairs(r) do
# table.insert(result, v) -- alternating keys and values
# end
# end
#
# -- Set foo to 42
# table.insert(result, "foo")
# table.insert(result, "42") -- note the string, use tostring() if needed
#
# return result
serviceMonitor:
# When set true then use a ServiceMonitor to configure scraping
enabled: false
# Set the namespace the ServiceMonitor should be deployed
# namespace: monitoring
# Set how frequently Prometheus should scrape
# interval: 30s
# Set path to redis-exporter telemtery-path
# telemetryPath: /metrics
# Set labels for the ServiceMonitor, use this to define your scrape label for Prometheus Operator
# labels: {}
# Set timeout for scrape
# timeout: 10s
podDisruptionBudget: {}
# maxUnavailable: 1
# minAvailable: 1
## Configures redis with AUTH (requirepass & masterauth conf params)
auth: false
# redisPassword:
## Use existing secret containing key `authKey` (ignores redisPassword)
# existingSecret:
## Defines the key holding the redis password in existing secret.
authKey: auth
persistentVolume:
enabled: true
## redis-ha data Persistent Volume Storage Class
## If defined, storageClassName: <storageClass>
## If set to "-", storageClassName: "", which disables dynamic provisioning
## If undefined (the default) or set to null, no storageClassName spec is
## set, choosing the default provisioner. (gp2 on AWS, standard on
## GKE, AWS & OpenStack)
##
# storageClass: "-"
accessModes:
- ReadWriteOnce
size: 10Gi
annotations: {}
# reclaimPolicy per https://kubernetes.io/docs/concepts/storage/persistent-volumes/#reclaiming
reclaimPolicy: ""
init:
resources: {}
# To use a hostPath for data, set persistentVolume.enabled to false
# and define hostPath.path.
# Warning: this might overwrite existing folders on the host system!
hostPath:
## path is evaluated as template so placeholders are replaced
# path: "/data/{{ .Release.Name }}"
# if chown is true, an init-container with root permissions is launched to
# change the owner of the hostPath folder to the user defined in the
# security context
chown: true
emptyDir: {}
1
2
3
1. 修改 “hardAntiAffinity: true” 为 “hardAntiAffinity: false” (仅限当replicas > worker node 节点数时修改)
2. 修改 “auth: false” 为 “auth: true”,打开 “# redisPassword:” 的注释并设置密码
1. 打开 “ # storageClass: “-“ ” 的注释,并修改 “-” 为 集群中的自动供给卷 “managed-nfs-storage”, 配置中 “size: 10Gi” 的大小为默认设置,可根据需要进行调整

接着,我们来通过如下helm命令来创建redis集群,

1
2
3
helm install --namespace redis redis-ha -f ./values.yaml ./redis-ha
helm upgrade redis-ha --namespace redis -f values.yaml ./redis-ha
helm delete redis-ha --namespace redis

创建成功之后,会有如下输出,

1
2
3
4
5
6
7
8
9
10
11
12
13
14
15
16
17
18
19
20
21
22
23
24
25
26
27
28
29
30
31
32
33
34
35
36
37
38
39
40
NAME: test-redis
LAST DEPLOYED: Sat Jul 17 21:56:12 2021
NAMESPACE: redis
STATUS: deployed
REVISION: 1
TEST SUITE: None
NOTES:
** Please be patient while the chart is being deployed **
Redis(TM) can be accessed on the following DNS names from within your cluster:
test-redis-master.redis.svc.cluster.local for read/write operations (port 6379)
test-redis-replicas.redis.svc.cluster.local for read-only operations (port 6379)
To get your password run:
export REDIS_PASSWORD=$(kubectl get secret --namespace redis test-redis -o jsonpath="{.data.redis-password}" | base64 --decode)
To connect to your Redis(TM) server:
1. Run a Redis(TM) pod that you can use as a client:
kubectl run --namespace redis redis-client --restart='Never' --env REDIS_PASSWORD=$REDIS_PASSWORD --image docker.io/bitnami/redis:6.2.4-debian-10-r13 --command -- sleep infinity
Use the following command to attach to the pod:
kubectl exec --tty -i redis-client \
--namespace redis -- bash
2. Connect using the Redis(TM) CLI:
redis-cli -h test-redis-master -a $REDIS_PASSWORD
redis-cli -h test-redis-replicas -a $REDIS_PASSWORD
To connect to your database from outside the cluster execute the following commands:
export NODE_IP=$(kubectl get nodes --namespace redis -o jsonpath="{.items[0].status.addresses[0].address}")
export NODE_PORT=$(kubectl get --namespace redis -o jsonpath="{.spec.ports[0].nodePort}" services test-redis-master)
redis-cli -h $NODE_IP -p $NODE_PORT -a $REDIS_PASSWORD

这样等待redis集群的创建了,我们也可以通过命令查看是否创建成功:

1
2
3
4
5
6
7
8
9
10
11
12
13
14
15
$ kubectl get all -n redis
NAME READY STATUS RESTARTS AGE
pod/test-redis-master-0 1/1 Running 0 24h
pod/test-redis-replicas-0 1/1 Running 1 24h
pod/test-redis-replicas-1 1/1 Running 0 24h
pod/test-redis-replicas-2 1/1 Running 0 23h
NAME TYPE CLUSTER-IP EXTERNAL-IP PORT(S) AGE
service/test-redis-headless ClusterIP None <none> 6379/TCP 24h
service/test-redis-master NodePort 172.21.0.201 <none> 6379:30676/TCP 24h
service/test-redis-replicas NodePort 172.21.6.241 <none> 6379:32112/TCP 24h
NAME READY AGE
statefulset.apps/test-redis-master 1/1 24h
statefulset.apps/test-redis-replicas 3/3 24h

这样创建全部成功,接下来就是使用redis了。

验证 redis-ha

1
2
3
4
5
6
7
8
9
10
11
12
13
14
15
16
17
18
19
20
21
22
23
24
25
26
27
28
29
#查看所有 pod
kubectl get pods
#执行结果
NAME READY STATUS RESTARTS AGE
nfs-client-provisioner-779bcc9dbb-vfjtl 1/1 Running 3 2d20h
redis-ha-server-0 3/3 Running 1 5h32m
redis-ha-server-1 3/3 Running 0 5h32m
#进入 redis-ha-server-0 容器内
kubectl exec -it redis-ha-server-0 sh
执行结果
Defaulting container name to redis.
Use 'kubectl describe pod/redis-ha-server-0 -n default' to see all of the containers in this pod.
/data $
# redis-cli 测试
/data $ redis-cli
127.0.0.1:6379> auth xxxxxxxxxxx(此处为 values.yaml 文件中设置过的密码)
OK
127.0.0.1:6379> keys *
1) "test"
127.0.0.1:6379> get test
"111"
127.0.0.1:6379> set test 222
OK
127.0.0.1:6379> get test
"222"
127.0.0.1:6379>

如果需要暴露给外部使用则需要再部署一个 NodePort Service

1
2
3
4
5
6
7
8
9
10
11
12
13
14
15
16
17
18
[root@k8s-master redis-cluster]# cat service.yaml
apiVersion: v1
kind: Service
metadata:
name: redis-ha-service #名称:随意
namespace: redis #名称:随意
labels:
app: redis-ha #部署的 redis-ha 名称
spec:
ports:
- name: redis-ha #部署的 redis-ha 名称
protocol: "TCP" #TCP 协议
port: 26379
targetPort: 6379
nodePort: 30379 #此为外部连接k8s redis-ha 服务的端口
selector:
statefulset.kubernetes.io/pod-name: redis-ha-server-0
type: NodePort
1
2
3
4
5
6
7
8
9
10
11
12
13
14
#部署 Service
kubectl apply -f service.yaml
#查看部署结果
kubectl get svc
执行结果
NAME TYPE CLUSTER-IP EXTERNAL-IP PORT(S) AGE
kubernetes ClusterIP 10.96.0.1 <none> 443/TCP 2d21h
redis-ha ClusterIP None <none> 6379/TCP,26379/TCP,9121/TCP 5h47m
redis-ha-announce-0 ClusterIP 10.99.18.87 <none> 6379/TCP,26379/TCP,9121/TCP 5h47m
redis-ha-announce-1 ClusterIP 10.100.130.186 <none> 6379/TCP,26379/TCP,9121/TCP 5h47m
redis-ha-service NodePort 10.109.28.12 <none> 26379:30379/TCP 3h25m
#此时可以通过 k8s 任意 master 节点 IP:30379 端口进行连接

故障转移实验

停止主redis:

复制代码

1
2
3
4
5
6
7
8
9
10
11
12
13
14
15
16
17
18
19
20
21
22
23
#1、在主上故障转移测试,使主down掉
redis-cli -h redis-ha-announce-0 -p 6379 debug segfault
#2、然后进入redis容器或sentinel容器
kubectl exec -it redis-ha-server-2 -c redis sh
kubectl exec -it redis-ha-server-0 -c sentinel sh
#3、容器里面使用redis客户端连接redis服务端
redis-cli -h redis-ha-announce-1 -p 6379
redis-cli -h redis-ha-announce-2 -p 6379
#容器里面使用redis客户端连接Sentinel服务端
redis-cli -h redis-ha-announce-0 -p 26379
#4、redis查看主从状态
info replication
#sentinel查看状态
INFO Sentinel
#5、查看日志
kubectl logs -f redis-ha-server-0 -c redis
kubectl logs -f redis-ha-server-1 -c redis
kubectl logs -f redis-ha-server-2 -c redis

复制代码

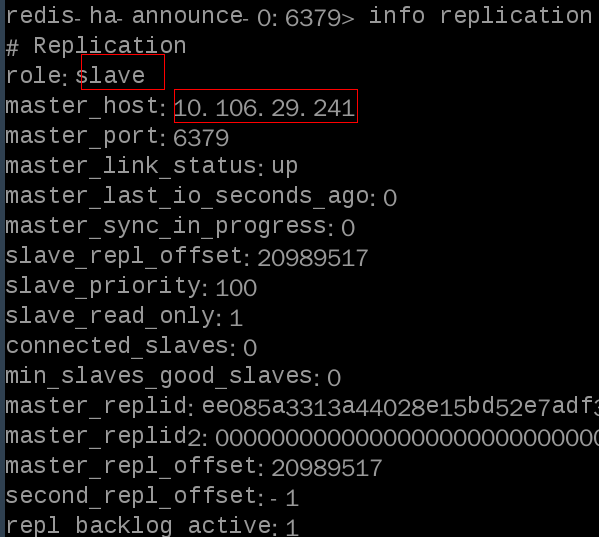
#主前任主上查看redis主从状态如下,10.106.29.241是第三台redis的ip,说转换成功了

img

Kafka入门及进阶段

发表于 2023-04-18   |  

1.1 Kafka入门

一、Kafka 是什么?

有人说世界上有三个伟大的发明:火,轮子,以及 Kafka。

发展到现在,Apache Kafka 无疑是很成功的,Confluent 公司曾表示世界五百强中有三分之一的企业在使用 Kafka。在流式计算中,Kafka 一般用来缓存数据,例如 Flink 通过消费 Kafka 的数据进行计算。

image

关于Kafka,我们最开始需要了解的是以下四点:

1.Apache Kafka 是一个开源 消息 系统,由 Scala 写成。是由 Apache 软件基金会开发的 一个开源消息系统项目。

2.Kafka 最初是由 LinkedIn 公司开发,用作 LinkedIn 的活动流(Activity Stream)和运营数据处理管道(Pipeline)的基础,现在它已被多家不同类型的公司作为多种类型的数据管道和消息系统使用。

3.Kafka 是一个分布式消息队列。Kafka 对消息保存时根据 Topic 进行归类,发送消息 者称为 Producer,消息接受者称为 Consumer,此外 kafka 集群有多个 kafka 实例组成,每个 实例(server)称为 broker。

4.无论是 kafka 集群,还是 consumer 都依赖于 Zookeeper 集群保存一些 meta 信息, 来保证系统可用性。

二、为什么要有 Kafka?

kafka 之所以受到越来越多的青睐,与它所扮演的三大角色是分不开的的:

消息系统:kafka与传统的消息中间件都具备系统解耦、冗余存储、流量削峰、缓冲、异步通信、扩展性、可恢复性等功能。与此同时,kafka还提供了大多数消息系统难以实现的消息顺序性保障及回溯性消费的功能。

存储系统:kafka把消息持久化到磁盘,相比于其他基于内存存储的系统而言,有效的降低了消息丢失的风险。这得益于其消息持久化和多副本机制。也可以将kafka作为长期的存储系统来使用,只需要把对应的数据保留策略设置为“永久”或启用主题日志压缩功能。

流式处理平台:kafka为流行的流式处理框架提供了可靠的数据来源,还提供了一个完整的流式处理框架,比如窗口、连接、变换和聚合等各类操作。

image.png

三、Kafka 基本概念

在深入理解 Kafka 之前,可以先了解下 Kafka 的基本概念。

一个典型的 Kafka 包含若干Producer、若干 Broker、若干 Consumer 以及一个 Zookeeper 集群。Zookeeper 是 Kafka 用来负责集群元数据管理、控制器选举等操作的。Producer 是负责将消息发送到 Broker 的,Broker 负责将消息持久化到磁盘,而 Consumer 是负责从Broker 订阅并消费消息。Kafka体系结构如下所示:

image

概念一:生产者(Producer)与消费者(Consumer)

image

对于 Kafka 来说客户端有两种基本类型:生产者(Producer)和 消费者(Consumer)。除此之外,还有用来做数据集成的 Kafka Connect API 和流式处理的 Kafka Streams 等高阶客户端,但这些高阶客户端底层仍然是生产者和消费者API,只不过是在上层做了封装。

Producer :消息生产者,就是向 Kafka broker 发消息的客户端;

Consumer :消息消费者,向 Kafka broker 取消息的客户端;

概念二:Broker 和集群(Cluster)

一个 Kafka 服务器也称为 Broker,它接受生产者发送的消息并存入磁盘;Broker 同时服务消费者拉取分区消息的请求,返回目前已经提交的消息。使用特定的机器硬件,一个 Broker 每秒可以处理成千上万的分区和百万量级的消息。

若干个 Broker 组成一个 集群(Cluster),其中集群内某个 Broker 会成为集群控制器(Cluster Controller),它负责管理集群,包括分配分区到 Broker、监控 Broker 故障等。在集群内,一个分区由一个 Broker 负责,这个 Broker 也称为这个分区的 Leader;当然一个分区可以被复制到多个 Broker 上来实现冗余,这样当存在 Broker 故障时可以将其分区重新分配到其他 Broker 来负责。下图是一个样例:

image

概念三:主题(Topic)与分区(Partition)

image

在 Kafka 中,消息以 主题(Topic)来分类,每一个主题都对应一个「消息队列」,这有点儿类似于数据库中的表。但是如果我们把所有同类的消息都塞入到一个“中心”队列中,势必缺少可伸缩性,无论是生产者/消费者数目的增加,还是消息数量的增加,都可能耗尽系统的性能或存储。

Kafka是天然分布式的。

备份分区仅仅用作于备份,不做读写。如果某个Broker挂了,那就会选举出其他Broker的partition来作为主分区,这就实现了高可用。

另外值得一提的是:当生产者把数据丢进topic时,我们知道是写在partition上的,那partition是怎么将其持久化的呢?(不持久化如果Broker中途挂了,那肯定会丢数据嘛)。

Kafka是将partition的数据写在磁盘的(消息日志),不过Kafka只允许追加写入(顺序访问),避免缓慢的随机 I/O 操作。

  • Kafka也不是partition一有数据就立马将数据写到磁盘上,它会先缓存一部分,等到足够多数据量或等待一定的时间再批量写入(flush)。

消费者在读的时候也很有讲究:正常的读磁盘数据是需要将内核态数据拷贝到用户态的,而Kafka 通过调用sendfile()直接从内核空间(DMA的)到内核空间(Socket的),少做了一步拷贝的操作。

img

附docker-compose.yml 脚本

1
2
3
4
5
6
7
8
9
10
11
12
13
14
15
16
17
18
19
20
21
22
23
24
25
26
27
28
29
30
31
32
33
34
35
36
37
38
39
40
41
42
43
44
45
46
47
48
49
50
51
52
53
54
55
56
57
58
59
60
61
62
63
64
65
66
67
68
69
70
71
72
73
74
75
76
77
78
79
80
81
82
83
84
85
86
87
88
89
90
91
92
93
94
95
96
97
98
99
100
101
102
103
104
105
106
107
108
109
110
111
112
113
114
115
116
version: "3"
services:
zookeeper:
image: 'confluentinc/cp-zookeeper:6.2.0'
hostname: zookeeper
ports:
- '2181:2181'
environment:
# 匿名登录--必须开启
- ALLOW_ANONYMOUS_LOGIN=yes
- ZOOKEEPER_CLIENT_PORT=2181
- ZOOKEEPER_TICK_TIME=2000
volumes:
- ./zookeeper/data:/var/lib/zookeeper/data:Z
- ./zookeeper/log:/var/lib/zookeeper/log:Z
# 该镜像具体配置参考 https://github.com/bitnami/bitnami-docker-kafka/blob/master/README.md
broker:
image: 'confluentinc/cp-kafka:6.2.0'
hostname: broker
ports:
- '9092:9092'
- "29092:29092"
#- '9999:9999'
environment:
- KAFKA_BROKER_ID=1
- KAFKA_LISTENER_SECURITY_PROTOCOL_MAP=PLAINTEXT:PLAINTEXT,PLAINTEXT_HOST:PLAINTEXT
- KAFKA_CFG_LISTENERS=PLAINTEXT://:9092
- KAFKA_ADVERTISED_LISTENERS=PLAINTEXT://192.168.3.92:9092,PLAINTEXT_HOST://localhost:29092
#- KAFKA_LISTENER_SECURITY_PROTOCOL_MAP=PLAINTEXT:PLAINTEXT
# 客户端访问地址,更换成自己的
#- KAFKA_CFG_ADVERTISED_LISTENERS=PLAINTEXT://192.168.3.92:9092
- KAFKA_ZOOKEEPER_CONNECT=zookeeper:2181
- KAFKA_GROUP_INITIAL_REBALANCE_DELAY_MS=0
# 允许使用PLAINTEXT协议(镜像中默认为关闭,需要手动开启)
- ALLOW_PLAINTEXT_LISTENER=yes
# 关闭自动创建 topic 功能
#- KAFKA_CFG_AUTO_CREATE_TOPICS_ENABLE=false
# 全局消息过期时间 6 小时(测试时可以设置短一点)
- KAFKA_CFG_LOG_RETENTION_HOURS=6
- KAFKA_OFFSETS_TOPIC_REPLICATION_FACTOR=1
- KAFKA_TRANSACTION_STATE_LOG_MIN_ISR=1
- KAFKA_TRANSACTION_STATE_LOG_REPLICATION_FACTOR=1
- KAFKA_HEAP_OPTS=-Xmx256M -Xms128M
# 开启JMX监控
#- JMX_PORT=9999
#- KAFKA_JMX_OPTS= -Dcom.sun.management.jmxremote=true -Dcom.sun.management.jmxremote.authenticate=false -Dcom.sun.management.jmxremote.ssl=false -Djava.rmi.server.hostname=192.168.3.92 -Dcom.sun.management.jmxremote.rmi.port=9999 -Dcom.sun.management.jmxremote.port=9999
volumes:
- ./kafka/data:/var/lib/kafka/data:Z
- ./kafka/config:/var/lib/kafka/config:Z
depends_on:
- zookeeper
schema-registry:
image: confluentinc/cp-schema-registry:6.2.0
hostname: schema-registry
container_name: schema-registry
depends_on:
- zookeeper
- broker
ports:
- "8081:8081"
environment:
SCHEMA_REGISTRY_HOST_NAME: schema-registry
SCHEMA_REGISTRY_KAFKASTORE_CONNECTION_URL: zookeeper:2181
connect:
image: confluentinc/cp-kafka-connect:latest
hostname: connect
container_name: connect
depends_on:
- zookeeper
- broker
- schema-registry
ports:
- "8083:8083"
environment:
CONNECT_BOOTSTRAP_SERVERS: broker:29092
CONNECT_REST_ADVERTISED_HOST_NAME: localhost
CONNECT_REST_PORT: 8083
CONNECT_GROUP_ID: ksql-connect-cluster
CONNECT_OFFSET_STORAGE_TOPIC: ksql-connect-configs
CONNECT_CONFIG_STORAGE_TOPIC: ksql-connect-topics
CONNECT_STATUS_STORAGE_TOPIC: ksql-connect-statuses
CONNECT_CONFIG_STORAGE_REPLICATION_FACTOR: 1
CONNECT_OFFSET_FLUSH_INTERVAL_MS: 10000
CONNECT_OFFSET_STORAGE_REPLICATION_FACTOR: 1
CONNECT_STATUS_STORAGE_REPLICATION_FACTOR: 1
CONNECT_KEY_CONVERTER: org.apache.kafka.connect.storage.StringConverter
CONNECT_VALUE_CONVERTER: io.confluent.connect.avro.AvroConverter
CONNECT_VALUE_CONVERTER_SCHEMA_REGISTRY_URL: http://schema-registry:8081
CONNECT_INTERNAL_KEY_CONVERTER: "org.apache.kafka.connect.json.JsonConverter"
CONNECT_INTERNAL_VALUE_CONVERTER: "org.apache.kafka.connect.json.JsonConverter"
CONNECT_ZOOKEEPER_CONNECT: 'zookeeper:2181'
ksqldb-server:
image: confluentinc/ksqldb-server:latest
hostname: ksqldb-server
depends_on:
- broker
ports:
- "8088:8088"
#healthcheck:
# test: curl -f http://ksqldb-server:8088/ || exit 1
environment:
KSQL_LISTENERS: http://0.0.0.0:8088
KSQL_BOOTSTRAP_SERVERS: 192.168.3.92:9092
KSQL_KSQL_LOGGING_PROCESSING_STREAM_AUTO_CREATE: "true"
KSQL_KSQL_LOGGING_PROCESSING_TOPIC_AUTO_CREATE: "true"
KSQL_KSQL_CONNECT_URL: http://connect:8083
ksqldb-cli:
image: confluentinc/ksqldb-cli:latest
container_name: ksqldb-cli
depends_on:
- ksqldb-server
- broker
entrypoint: /bin/sh
tty: true

Kafka topic CLI:

1
kafka-topics --bootstrap-server localhost:9092 --list

image-20230418103634592

1
kafka-console-producer --broker-list localhost:9092 --topic test

image-20230418103936415

1
kafka-console-consumer --bootstrap-server localhost:9092 --topic test --from-beginning

image-20230418104000562

1
docker exec -it ksqldb-cli ksql http://ksqldb-server:8088

image-20230418110419615

1
show topics;

image-20230418110443996

1
2
CREATE STREAM riderLocations (profileId VARCHAR, latitude DOUBLE, longitude DOUBLE)
WITH (kafka_topic='locations', value_format='json', partitions=1);
1
2
3
4
5
6
INSERT INTO riderLocations (profileId, latitude, longitude) VALUES ('c2309eec', 37.7877, -122.4205);
INSERT INTO riderLocations (profileId, latitude, longitude) VALUES ('18f4ea86', 37.3903, -122.0643);
INSERT INTO riderLocations (profileId, latitude, longitude) VALUES ('4ab5cbad', 37.3952, -122.0813);
INSERT INTO riderLocations (profileId, latitude, longitude) VALUES ('8b6eae59', 37.3944, -122.0813);
INSERT INTO riderLocations (profileId, latitude, longitude) VALUES ('4a7c7b41', 37.4049, -122.0822);
INSERT INTO riderLocations (profileId, latitude, longitude) VALUES ('4ddad000', 37.7857, -122.4011);
select * from riderLocations;
1
ksql> select * from riderLocations;

image-20230418111709787

1
2
CREATE TABLE myNearDemo AS \
>select profileId,la,lo from currentLocation ;

image-20230418151308205

监测变化

1
select * from myNearDemo EMIT CHANGES;

image-20230418151345474

原始流 stream 里插入元数据

image-20230418151452071

1
2
ksql> INSERT INTO riderLocations (profileId, latitude, longitude) VALUES ('4ddad000', 38.7857, -122.4012);

image-20230418151605116

Mysql使用pt-query-digest分析日志

发表于 2023-02-22   |  

1. 开启慢查询日志

(1)首先我们要创建一个文件夹用于保存慢查询日志文件,并且设置 mysql 有权读写该目录:

1
mkdir` `/``var``/log/mysql``sudo ``chown` `mysql:mysql -R /``var``/log/mysql

(2)我们可以登入 mysql 命令行后执行如下命令,使用 set 设置变量来临时开启。注意这种方式重启服务即失效。

1
set ``global` `slow_query_log=on; ``//开启慢查询功能``set ``global` `slow_query_log_file=``'/var/log/mysql/mysql-slow.log'``; ``//指定慢查询日志文件位置``set ``global` `log_queries_not_using_indexes=on; ``//记录没有使用索引的查询(非必须)``set ``global` `long_query_time=1; ``//只记录处理时间1s以上的慢查询

(3)或者我们也可以通过修改配置文件来永久开启慢查询日志功能,首先编辑配置文件:

1
vi /etc/my.cnf
  • 然后在里面添加如下高亮配置:
1
[mysqld]``slow_query_log=on #开启慢查询功能``slow_query_log_file=``'/var/log/mysql/mysql-slow.log'` `#指定慢查询日志文件位置``log_queries_not_using_indexes=on #记录没有使用索引的查询(非必须)``long_query_time=1 #只记录处理时间1s以上的慢查询
  • 保存关闭文件后,执行如下命令重启 mysql 即可:
1
service mysqld restart

2. 查看慢查询功能是否开启

(1)登入 mysql 命令行后执行如下命令可以查看慢查询开启状态,以及慢查询日志存放的位置:

1
show variables like ``'slow_query%'``;

(2)执行如下命令可以查看查询超过多少秒才记录:

1
show variables like ``'long_query_time'``;

3. 慢查询测试

(1)首先我们执行一个如下的 sql,模拟一个 2 秒的慢查询:

1
select sleep(2);

(2)查看日志可以发现这个慢查询已经被记录:

1
cat /``var``/log/mysql/mysql-slow.log

使用 pt-query-digest 工具分析慢查询日志

1,工具安装

(1)首先我们执行如下命令将 rpm 包下载到本地:

注意:如果下载不下来也可访问其官网(点击打开),手动下载下来再上传到服务器上。

1
wget https:``//downloads.percona.com/downloads/percona-toolkit/3.2.1/binary/redhat/7/x86_64/percona-toolkit-3.2.1-1.el7.x86_64.rpm

(2)接着使用 yum 命令进行安装:

1
yum install -y percona-toolkit-3.2.1-1.el7.x86_64.rpm

2. 分析慢查询日志

(1)执行如下命令可以分析指定的慢查询日志文件:

1
pt-query-digest /``var``/log/mysql/mysql-slow.log

(2)分析结果分为三部分,第一部分是总体统计结果:

  • Overall:总共有多少条查询
  • Time range:查询执行的时间范围
  • unique:唯一查询数量,即对查询条件进行参数化以后,总共有多少个不同的查询
  • total:所有查询总计时长
  • min:所有查询最小时长
  • max:所有查询最大时长
  • avg:所有查询平均时长
  • 95%:把所有时长值从小到大排列,位置位于 95% 的那个时长数,这个数一般最具有参考价值
  • median:中位数,把所有时长值从小到大排列,位置位于中间那个时长数

(3)第二部分是查询分组统计结果:

  • Rank:所有语句的排名,默认按查询时间降序排列,通过 –order-by 指定
  • Query ID:语句的 ID(去掉多余空格和文本字符,计算 hash 值)
  • Response:总的响应时间
  • time:该查询在本次分析中总的时间占比
  • Calls:执行次数,即本次分析总共有多少条这种类型的查询语句
  • R/Call:平均每次执行的响应时间
  • V/M:响应时间 Variance-to-mean 的比率
  • Item:查询对象

(4)第三部分是每一种查询比较慢的 sql 的详细统计结果:

  • pct:该 sql 语句某执行属性占所有慢查询语句某执行属性的百分比
  • total:该 sql 语句某执行属性的所有属性时间。
  • Count:sql 语句执行的次数。对应的 pct 表示此 sql 语句执行次数占所有慢查询语句执行次数的 % 比(下图为 10%),对应的 total 表示总共执行了 3 次。
  • Exec time:sql 执行时间
  • Lock time:sql 执行期间被锁定的时间
  • Rows sent:传输的有效数据,在 select 查询语句中才有值
  • Rows examine:总共查询的数据,非目标数据。
  • Query_time distribution:查询时间分布
  • SQL 语句:下图中为 select sleep(7)\G

3. 进阶用法

(1)分析 slow.log 日志,并将分析报告输入到 slow_report.log 中:

1
pt-query-digest slow.log > slow_report.log

(2)分析最近 12 小时内的查询:

1
pt-query-digest --since=12h slow.log > slow_report2.log

(3)分析指定时间范围内的查询:

1
pt-query-digest slow.log --since ``'2020-04-17 09:30:00'` `--until ``'2020-04-17 10:00:00'` `> slow_report3.log

(4)分析指含有 select 语句的慢查询:

1
pt-query-digest --filter ``'$event->{fingerprint} =~ m/^select/i'` `slow.log> slow_report4.log

(5)针对某个用户的慢查询:

1
pt-query-digest --filter ``'($event->{user} || "") =~ m/^root/i'` `slow.log> slow_report5.log

(6)查询所有的全表扫描或 full join 的慢查询:

1
pt-query-digest --filter ``'(($event->{Full_scan} || "") eq "yes") ||(($event->{Full_join} || "") eq "yes")'` `slow.log> slow_report6.log

(7)把查询保存到 query_review 表:

1
pt-query-digest --user=root –password=abc123 --review h=localhost,D=test,t=query_review--create-review-table slow.log

(8)通过 tcpdump 抓取 mysql 的 tcp 协议数据,然后再分析:

1
tcpdump -s 65535 -x -nn -q -tttt -i any -c 1000 port 3306 > mysql.tcp.txt``pt-query-digest --type tcpdump mysql.tcp.txt> slow_report9.log

(9)分析 binlog:

1
mysqlbinlog mysql-bin.000093 > mysql-bin000093.sql``pt-query-digest --type=binlog mysql-bin000093.sql > slow_report10.log

(10)分析 general log:

1
pt-query-digest --type=genlog localhost.log > slow_report11.log

Elastic 使用极限网关进行数据双向切换

发表于 2023-02-09   |  

极限网关 (INFINI Gateway) 是一个面向 Elasticsearch 的高性能应用网关,它包含丰富的特性,使用起来也非常简单。极限网关工作的方式和普通的反向代理一样,我们一般是将网关部署在 Elasticsearch 集群前面, 将以往直接发送给 Elasticsearch 的请求都发送给网关,再由网关转发给请求到后端的 Elasticsearch 集群。因为网关位于在用户端和后端 Elasticsearch 之间,所以网关在中间可以做非常多的事情, 比如可以实现索引级别的限速限流、常见查询的缓存加速、查询请求的审计、查询结果的动态修改等等

下载安装

1
2
3
wget https://release.infinilabs.com/gateway/stable/gateway-1.8.6-769-linux-amd64.tar.gz
tar vxzf gateway-1.8.6-769-linux-amd64.tar.gz
mv gateway-linux-amd64 bin/gateway

验证安装

极限网关下载解压之后,我们可以执行这个命令来验证安装包是否有效,如下:

1
2
✗ ./bin/gateway -v
gateway 1.0.0_SNAPSHOT 2021-01-03 22:45:28 6a54bb2

如果能够正常看到上面的版本信息,说明网关程序本身一切正常。

启动网关

1
2
3
4
5
6
7
8
9
10
11
12
13
14
15
16
17
18
19
20
21
22
23
24
25
26
27
28
29
30
31
32
33
34
35
36
37
38
39
40
41
42
43
44
45
46
47
48
49
50
51
52
53
54
55
56
57
58
59
60
61
62
63
64
65
66
67
68
69
70
71
72
73
74
75
76
77
78
79
80
81
82
83
84
85
86
87
88
89
90
91
92
93
94
95
96
97
98
99
100
101
102
103
104
105
106
107
108
109
110
111
112
113
114
115
116
117
118
119
120
121
122
123
124
125
126
127
128
129
130
131
132
133
134
135
136
137
138
139
140
141
142
143
144
145
146
147
148
149
150
151
152
153
154
155
156
157
158
159
[root@k8s-master gateway]# cat /opt/gateway/gateway.yml
# 数据路径
path.data: data
# 日志路径
path.logs: log
# 定义 Elasticsearch 集群地址
elasticsearch:
# cluster01 集群
- name: cluster01
enabled: true
endpoint: http://192.168.10.15:9200
basic_auth:
username: elastic
password: IQsMLRniP5BcYfoNzTBT
discovery:
enabled: true
refresh:
enabled: true
interval: 1s
# cluster02 集群
- name: cluster02
enabled: true
endpoint: http://192.168.10.15:30993
basic_auth:
username: elastic
password: IQsMLRniP5BcYfoNzTBT
discovery:
enabled: true
refresh:
enabled: true
interval: 1s
# 定义网关入口
entry:
- name: my_es_entry
enabled: true
router: my_router
network:
binding: 0.0.0.0:8000
# 定义工作流
flow:
- name: auth-flow
filter:
#- basic_auth:
# valid_users:
# elastic: ******
- set_basic_auth:
username: elastic
password: IQsMLRniP5BcYfoNzTBT
- name: set-auth-for-backup-flow
filter:
- set_basic_auth: #覆盖备集群的身份信息用于备集群正常处理请求
username: elastic
password: IQsMLRniP5BcYfoNzTBT
# 写请求优先发给主集群, 当主集群不可用时发给备集群
# 当主集群数据写入成功时,记录到队列中,异步消费写入备集群
- name: write-flow
filter:
- flow:
flows:
- auth-flow
- if:
# 当主集群可用时
cluster_available: ["cluster01"]
then:
# 先将数据写入主集群
- elasticsearch:
elasticsearch: "cluster01"
# 写入消息队列,等待 pipeline 异步消费到备集群
- queue:
queue_name: "cluster02-queue"
else:
- elasticsearch:
elasticsearch: "cluster02"
- queue:
queue_name: "cluster01-queue"
# 读请求优先发给主集群, 当主集群不可用时发给备集群
- name: read-flow
filter:
- flow:
flows:
- set-auth-for-backup-flow
- if:
cluster_available: ["cluster01"]
then:
- elasticsearch:
elasticsearch: "cluster01"
else:
- elasticsearch:
elasticsearch: "cluster02"
# 路由规则
router:
- name: my_router
# 默认路由
default_flow: write-flow
# 读请求路由
rules:
- method:
- "GET"
- "HEAD"
pattern:
- "/{any:*}"
flow:
- read-flow
- method:
- "POST"
- "GET"
pattern:
- "/_refresh"
- "/_count"
- "/_search"
- "/_msearch"
- "/_mget"
- "/{any_index}/_count"
- "/{any_index}/_search"
- "/{any_index}/_msearch"
- "/{any_index}/_mget"
flow:
- read-flow
# 定义管道, 异步将数据写入备集群
pipeline:
- name: cluster01-consumer
auto_start: true
keep_running: true
processor:
- queue_consumer:
input_queue: "cluster01-queue"
elasticsearch: "cluster01"
when:
cluster_available: ["cluster01"] # 当集群可用时,才消费队列中的数据
- name: cluster02-consumer
auto_start: true
keep_running: true
processor:
- queue_consumer:
input_queue: "cluster02-queue"
elasticsearch: "cluster02"
when:
cluster_available: ["cluster02"]
elastic:
enabled: true
remote_configs: false
health_check:
enabled: true
interval: 1s
availability_check:
enabled: true
interval: 1s
metadata_refresh:
enabled: true
interval: 1s
cluster_settings_check:
enabled: false
interval: 1s

启动网关

[root@k8s-master gateway]# ./bin/gateway

测试准备

建立本地docker es 集群,配置如下

1
2
3
4
5
6
7
8
9
10
11
12
13
14
15
16
17
18
19
20
21
22
23
24
25
26
27
28
29
30
31
32
33
34
35
36
37
38
39
40
41
42
43
44
45
46
47
48
49
50
51
52
53
54
55
56
57
58
59
60
61
62
[root@k8s-master gateway]# cat docker-compose.yml
version: '3.8'
services:
# 集群 cluster01
# Elasticsearch
es01:
image: docker.io/library/elasticsearch:7.9.3
container_name: es01
environment:
# 节点名
- node.name=es01
# 集群名
- cluster.name=cluster01
# 指定单节点启动
- discovery.type=single-node
# 开启内存锁定
- bootstrap.memory_lock=true
# 设置内存大小
- "ES_JAVA_OPTS=-Xms2g -Xmx2g"
# 启用安全
- xpack.security.enabled=true
# 设置 elastic 用户密码
- ELASTIC_PASSWORD=IQsMLRniP5BcYfoNzTBT
ulimits:
memlock:
soft: -1
hard: -1
# 映射到主机名的端口 宿主机端口:容器端口
ports:
- 9200:9200
volumes:
- data01:/usr/share/elasticsearch/data
networks:
- elastic
# Kibana
kib01:
image: kibana:7.9.3
container_name: kib01
ports:
- 5601:5601
environment:
# Elasticsearch 连接信息
ELASTICSEARCH_URL: http://es01:9200
ELASTICSEARCH_HOSTS: '["http://es01:9200"]'
ELASTICSEARCH_USERNAME: elastic
ELASTICSEARCH_PASSWORD: IQsMLRniP5BcYfoNzTBT
networks:
- elastic
# 存储卷
volumes:
data01:
driver: local
data02:
driver: local
data03:
driver: local
# 网络
networks:
elastic:
driver: bridge

k8s 集群(已提前搭建)

kubectl exec -it $(kubectl get pods -n esbeta| grep elasticsearch-client | sed -n 1p | awk ‘{print $1}’) -n esbeta – bin/elasticsearch-setup-passwords interactive

12…16
peterfei

peterfei

peterfei|技术|上主是我的牧者

77 日志
14 分类
62 标签
RSS
github
© 2023 peterfei
由 Hexo 强力驱动
主题 - NexT.Mist